Sunday, October 22, 2017

Sewing and other crafts

Hello dear readers,
I haven't yet brought my sewing machine to my new home, the reason is that I don't have a table to use for sewing. And I really don't like sewing on the dining table in kitchen, it just doesn't feel nice knowing that there might be some leftovers on the floor with you fabrics, even if you have cleaned everything quite well.
This past week I've helped my sis to sew trousers, that were a success in the end and at the same thing I did sew some of my use-all-ugly-fabric projects.
I still don't know what made me do kids clothes in the first place, but at least those super quick to make.
Here are just a few I made, all overalls or something like that. I found an old sewing magazine form around -98 with good baby patterns and made overalls on the left. And on the right I also made the overall from an old magazine. I wasn't happy with the pattern and the result is not-so-good. But at least the fabric is nice, right?

And this is a head for a doll. I made a similar when I was about a 4th grader from white clay and I think that doll broke and mum threw it away. It was a baby boy doll, with blue eyes and dark hair. It's a pity that I don't have a picture of it... I don't know yet what this is going to be.

Have a nice week!
- Minttusuklaa

Monday, September 25, 2017

Dolls and more dolls

Hello all,
I had a lot of free time last week (and I could have used it better though) and of course I was looking for new ideas abot what to make instead of finishing all the school essays.
When I was in 4th grade or so my mom's friends organized a day where I made a clay doll and for the past week my fingers have been itching to make one. Where I live now, there are no craft shops near, so today I finally managed to go and by some airdry clay.
In Finland I couldn't find any retailers selling good doll clay, so I opted for air dry children's clay and I ended up with my. I hope it is a good idea, I haven't tried it at all. But it was mistakenly on sale, so that's why I bought it...
So my next post will probably be about how I managed to do a doll from that. I'm thinking of making the head and hands/feet from clay, and the body will be probably made from cotton fabric.
And when I went to the shop I was so happy that I found dollneedles from there, I've wanted to buy a long needle for making soft toys and now I have three.The palstic eggs are for the doll's head, and in case I decide to make more than one doll I bought several...

And my new doll says hello, he still doesn't have clothes. But at least I managed to give him hair.


Wednesday, September 13, 2017

Back to normal life

Hello,
My studies still continue and I still do knitting during boring and not-so-boring lectures. Yesterday and today I've spent my time totally multitasking: Reading to a test/listening to a test/ Knitting, so it is time well spent.
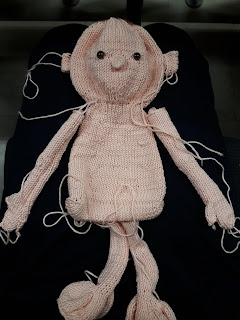
I did an argeological adventure to my yarn stash and found my skin colour yarns and decided to test knit my own basic body pattern I had written down in April. The doll turned out nice, though it is still in pieces.I used DK yarn (drops muskat) and 2,5mm needles. Last time knitted the doll with 2,5mm needles and fignering yarn. I think this doll turned out a bit too large, but well, it is cute enough. I took over 100grams of yarn. Next time using DK yarn, I'm going to do some adjustments to the pattern to make the doll smaller.
My idea was to make a wedding couple, but I don't know about this one. I can picture it in baby or toddler clothes in my head mostly, which is totally crazy. It probably depends on the eye colour I decide to use.
I'm trying to get the basic body pattern to the point where I can publish it, but it still needs some fixes to it. The doll is done both knitting in flat and using DPNs. I like when I can use both techniques, it gives a fun feeling to knitting.
In the future I hope to do patterns that combinen both knitting and croheting, that would be so cool :)

P.s. Now I can finally say that I've finally moved out from my parents place, like after seven years of studying. Though I still have about 1/3 of my stuff in my old room that now belongs to my lil bro. And every time I visit my parents and use my old room, he comes in asks: What are you doing IN MY ROOM?. He even put a sign on the door that says it is his room. He is just so cute.

Sunday, August 27, 2017

Wedding dress Final part

Hello dear readers!

I got married yesterday and so far I've liked my married life. This past month was very hectic but I managed to get my dress done in the end.
I had so many troubles during the process, but the dress turned out fabulous. It took weeks to finish, but it was totally worth every tear, all the sweating and blood stains on the white fabric. My wedding was just so perfect!
Almost everything I wore on my day was DIY: my dress, petticoat, bolero, veil, rose for hair. Well the shoes I bought.
So because this is a knitting/crocheting/sewing blog,  I need to give out basic insturctions or ideas for people that want to make their own wedding dress/evening dress
I'll post the picture of the finished dress after I get back from my short trip and I have time to go through all the pics taken from wedding.

This  posting is about the dress, I'll make next post about other wedding accesories
1) Take your time deciding the pattern and consider different options
2) Choose fabric wisely. I made my dress from Duchess Satin and it was a good fabric. Easy enough to sew and believe it or not, but I dropped coffee on my hem during the event and I just needed to wipe it away, the gabric didn't stain. (But I happen to have grass marks on the hem from picture session)
3) Do enough practice runs and pattern modifications. I made two practice version of the bodice and it was a good thing to do. It is so much easerie to adjust the length of the back and the fitting of the breasts with practice fabric. Do fitting with enough mirrors and with a help of a frien or a bridesmaid.
4) If you have a large hem and a fitted bodice consider making the dress in two pieces. My bodice was fitted and I didn't need addtional support from bones/rigillene, but because the hem was full length half a circle I weighted so much, I thought that it would pull the bodice too low. My stress was strapless and quite low cut and I didn't want to spend time adjusting the dress and being scarde that it would reveal too much.

4b) If you make it a two piece dress BUY a LONG enough zipper!!! I had to redo the zipper at least three or four times and it left small holes on the fabric (if you have the patience you do buttons...) I bought a separate foot for invisible zippers for sewing machine, it cost a lot, but the zipper turned out good. Remember to too the practice runs so that you have the amount of sewing allowances for zipper measured correctly. I had trouble trying to take of the dress so I needed to redo the zipper again and adjust it better.
4c) I bough a 45cm zipper and sewed the whole zipper to the dress bodice. Then closed the zipper and just to the lower part I made a few stistch for a zipper stopper and the I cut the left over zipper with scissor.
5) You can save ugly parts with pearls. The internet is full of amazing tutorials on different kind of pearl flowers and so on.
6) Cold water + mom is a good combination if you happen to get blood on your dress like I did.
7) Some people turn the bottom part of hem and sticht it by hand, I had a special foot for hem turning that came with the sewing machine when I bought it. I've never used it and didn't know how to, but there was a good german tutorial on YouTube and hey, it is a good thing to learn something new.
These are just few of the thing I learnt making my own dress. 

Sunday, July 16, 2017

Wedding dress part I

Hello all,I had a loooong week at work, normally it is not that peacuful in a hospital ward, but the past week was. So I was quite energized after coming home and had time to start sewing my wedding dress and this posting is  about what I've learnt so far:

1) Choosing the pattern
  It can be tricky to find a pattern that matches your tastes. I went through my old sewing magzines and borrowed magazines from my friends. There were many good options or patterns that were usable for a wedding dresses like ball gowns/evening dresses/dancing gowns/party tops and shirts/skirts.
I had an idea what to do but  I changed the pattern midway thorugh, because I couldn't find a decents pattern for an illusion neckline and I saw the price tag for the prettiest laces. And I didn't want to use lace that costs 70 euros/meter, so I opted for a more ball gown type style.
Back
I got an suggestion to visit dress shops to see what kind of a dress style suits my body type, but guess who never had time to actually do that? And besides I always end up picking similar dress: a fitted bodice and a full skirt,  I just like that kind of dresse so why bother changing my style?

2) Getting an idea what to buy
 Go to the fabric store and ask all tricky questions you have concerning the materials there. Check out the fabrics they have and how those fabrics feel to your touch and imagine that you are spending an entire day in that fabric. And it is a good thing to know your charcter, I know that I wouldn't have the patience to use elastic fabric or a very thin fabric. That is the main reason why I am choosing something like satin or taffeta.
The personnel is there for you to help to pick the right fabric and get what you need. And at least in Finland I got good recommendations from one the women in the fabric store about where to find the rest of my shopping list that they didn't have. They are experts on what kind of needles and thread to choose.

3) First prototype
Front
I made my first attempt at the bodice model this week just see if the pattern fits or is it a total disaster on me. I used an old curtain fabric I had in my storage, I just made the pattern according to all instruncitons and didn't do any alternations. I cut the fabric with the corrcet seam allowances and didn't do any finishing touches yet. The result isn't that pretty I guess but it gives me the idea of how the bodice will look and what tricks I need to do the pattern before making a second prototype.
Use cheap or old fabric for prototypes, I've had old fabrics around as long as I can remember and old curtains are just good. I used cotton fabric for mine because the final dress will be fitted and I wanted to use a fabric that doesn't stretch. If I had ended up using lace or some more elastic fabric I would've picked propaplya more elastic fabric for a prototype.
Good thing about using cotton is that I could draw all seam allowances on fabric along with other cuts. It made the sewing so much easier. I know that I can't use normal pen on satin or taffeta, but who cares about the prototypes?

Seam allowances drawn on fabric
Extra1: Buy a good sewing handbook, you are going to need it. I found mine on sale for 10 euros and it is worth every cent now.
Extra2: It is a good thing to have a good relationship with your old handicrafts teacher back in school, my old teacher was very happy to offer advice on how to do a fitted bodice.

Have a blessed week!
- Minttusuklaa, who is having trouble not to turn this into a wedding blog

Sunday, July 9, 2017

Wedding preparations II

Hello all readers,

I just love summer! It is the most best season during the year, at least this summer has been amazing. I've notived that I've really started to stress about my wedding, but that is quite normal isn't it?
This past week, we have finalized the menu and planned most of the whole reception. In Finland we traditionally have outdoor weddings and self-written wedding vows. But we're gonna have those. So I'm totally planning to do an untraditional Finnish wedding.

This week my work hasn't been so intense, but designing decorations and planning the schedule for wedding has taken quite a lot of time.
Well at least I have a design for my flower girls' dresses. They're going to look absolutely cute. I'm happy that I don't need to sew their dresses. The dresses are goinf to be pure white, with navyblue sash/belt and roses on the hem. And if the girls want, their mom can add a layer of organza to the waist.


 As for decorations and placing cards I found that you can make very nice looking decorations out of pine cones. So I asked my youngest little brother to pick up 400 pine cones from my grandparents place and I just received them today. Then next thing to do is to paint them with silver, navy blue and white/vanilla. And the best place to buy paints is a shop specialized in selling car stuff according to my brother.

Oh and I was buying clothes from sale today and went of course to a diy shop and found cute rose petals that are going to be turned into roses and hair decorations with my veil. The glasse are also for table decorations and hopefully I can find more good looking glasses, probably gonna search tthorugh second hand shops for that.

So all in all, my wedding preparations are going pretty well

- Soon to be MRS


Sunday, July 2, 2017

Wedding preparations I

Hi all,

Sorry for not posting anything in June. My June was just so hectic with making wedding invitations, planning THE dress, moving back to my parents place and doing an internship with a surgical department. I just didn't have the energy to pick up ctochet hooks or knitting needles at all.

But all in all everything is going fine, we bought bridemaids dresses today (from summer sales of course) and I even went out to try shoes (pity that the pretties shoes were blue...). I've done a few sketches about how my dress should look like and this is the best version:
For the fabric I'm going to use either satin or taffeta, I don't know which one yet, but probably the cheaper one. I plan to use a zipper and sew blue buttons to the back just to look nice and add some blue pearls or sequins to the front. And straps? I haven't decided yet.
My friends have promised to make the veil and now I just need to figure out a pretty hairdo, that won't be too hard, right?
And I still need to design dresses for flower girls. That is going to be so much fun 👗. They are probably going to need nice flower crowns with crocheted flowers and cute pearl.

- Soon-to-be-Mrs-


Sunday, May 28, 2017

Warm weather and warm feelings

Hello all,
 
My summer vacation is halfway thorugh and then I'm starting my practice. I went to my grandparents summer cottage and because it is so far away from my home and I had to time crochet during the drive. 
I know that not everyone can knit or read while driving, but for me I'm happy that I can use that time well and do something. When I was a kid I just felt sick in car but in high school I had to go by bus and I didn't like sitting in a bus for a long time so I started reading and knitting and somehow I manged to survive through those boring bus rides to school.

But this is what I made this week: a flowerfield dress for someone aroun 2 years. The pattern was from an old magazine I got from great-great-aunt years ago. I had stored purple yarn but I used all the yarn for my laptop case, but these yarns are way much cuter. I had decided to make this dress already when I first received the crochet magazine. 
First I thought that it was too hard to make, but in the end the chart was well written and even flower pattern was well made so the dress took probably just two days to make.
 I haven't done any crocheted clothes before because in my opinion knitting just looks better, but maybe I'll do something similar to this in the future. My little sister suggested that I should make another with hearts on it. I made the hem from my old dress' fabric that I haI just hope to find a little girl that can wear this dress 👸

- Happy end of May for everyone


Monday, May 22, 2017

*Lynx* free pattern


I like wildcats, though I've only seen them in zoos. My grandma did see one at grandparents summer cottage few years ago though, but I guess our family is too noisy when we visit that place and we scare away every animal there is...
I had an idea to make a Eurasian lynx and this is what I came up with: 
My sister says that he is too skinny and she is quite good critic, so maybe you should add one increase and decrease row if you want to


Lynx
 
You need:
DK yarn about 70grams (yellowish yarn), I used Drops Muskat
Little bit of brown, black and white yarn
3mm hook
Safety eyes
Stuffing
Tapestry needle
Pattern in US terms

Body (make 1), with yellow yarn:

Ch2, 6sc to 2nd ch from the hook. 
 1)      2sc in each sc
2)      [2sc, 1sc] repeat to end
3)      [2sc, 1sc x2] repeat to end
4)      [2sc, 1sc x3] repeat to end.
5)       [2sc, 1sc x4] repeat to end
6)      [2sc, 1sc x5] repeat to end
7)      – 16 ) sc-around
17) [sc-dec, 1sc x5] repeat around
18-19) sc around
20) [sc-dec, 1sc x4] repeat around
21) sc around
22) [sc-dec, 1sc x3] repeat around
23) [sc-dec, 1sc x2] repeat around
24) [sc-dec, 1sc] repeat around


Head (make 1 with yellow yarn)

Ch2, 6sc to 2nd ch from the hook.
1)      2sc in each sc
2)      [2sc, 1sc] repeat to end
3)      [2sc, 1sc x2] repeat to end
4)      [2sc, 1sc x3] repeat to end.
5)       [2sc, 1sc x4] repeat to end
6)      [2sc, 1sc x5] repeat to end
7)      [2sc, 1sc x6] repeat to end.
8)      – 11) sc around
12) 2sc, 1sc x 2, 2sc, 1scx2, 2sc, sc to end
13) 2sc, 1sc x 5 , 2sc, sc to end
14) 1sc, sc-dec, 1sc x5, sc-dec, sc to end
15) sc-dec, 1sc, sc-dec, 1sc, sc-dec, sc to end
16) [sc-dec, 1sc x6] repeat around
17) [sc-dec, 1sc x5] repeat around
18) [sc-dec, 1sc x4] repeat around
19) [sc-dec, 1sc x3] repeat around
20) [sc-dec, 1sc x2] repeat around
21) [sc-dec, 1sc] repeat around

Legs (make 2)
With brown yarn: Ch 5, sc to 2nd ch from the hook. Sc to every ch. Turn, sc to every ch. (8sc in total)

1)      2sc, 1 sc x 2, 2sc x2, 1scx2, 2sc
Change to yellow yarn
2)      2sc x2, 1sc x2, 2scx4, 1s x2, 2sc x2
3)      2sc x1, 1scx6, 2sc x6, 1sc x6, 2scx1
Sc around for 3 rows
7) 1scx8, sc-dec x 6, 1sc x8
8) 1sc x6, sc-dec x5, 1sc x6
9) 1sc x5, sc-dec x4, 1scx4
10) sc-decx1, sc to ends
Sc around for 13 row

Arms (make 2)
With white yarn: Ch 2, 6sc to 2nd ch from the hook.
1)      2sc in each sc
2)      [2sc, 1sc] repeat to end
Change to yellow yarn
3-5) sc around
6) Sc-dec around
Sc-around for 10 rows.


Eye patches with white yarn
(I have to confess that I used aran yarn here, but if you use DK yarn, you can change to hook 3.5mm/4mm)
Ch4, 2sc to 2nd ch from the hook, 1sc x2, turn and to other side of chs: 1scx2, 2sc x1 and slip stitch to join rows.

Nose:
with white yarn
Ch 5, 2sc to 2nd ch from the hook. 
1sc, 2sc x1, 1sc, turn and to other side of chs: 1scx4, 2sc x1 and slip stitch to join rows.

Tail
With black yarn: Ch 2, 5sc to 2nd ch from the hook.
1)      2sc in each sc
2-4) sc around. Change to yellow yarn and sc around 7 rows.

Ears (make 2 with yellow yarn)
Ch 2, 5sc to 2nd ch from the hook.
1)      2sc in each sc
2)      Sc around
3)      [2sc, 1sc] repeat to end
4)      Sc around
5)      Sc around

Finishing

Attach eye pieces to head just above the nose increases and decreases. Attach safety eyes to eyepieces and head, secure firmly. Stuff head and body. Sew nose piece also in place. Sew head and body together. Sew ears in place, I didn’t put any stuffing to in ears. Stuff legs and arms. Sew legs to the bottom and arms to body just below the neck (See pictures).
I made the finishing touches for ears as following: I cut black yarn into 3inch/7cm pieces (I had to cut the shorter), six for each ear. Then with the crochet hook I pulled the yarn pieces one by one halfway through the ear and then I made about three knots and secured those yans in their place.

I used black yarn for spots, and just embroidered them: First I made a X-looking stiches and the one vertical stitch in the middle. I used embroidery to hide showing stuffing in legs…

And your cat is done!

- Minttusuklaa

p.s. the pattern isn't tested so please tell me if you find any errors

Sunday, May 14, 2017

Getting things done

Hello,

Weather is getting better and spring flowers are already blooming here. I love the smell and sound of sunny spring days when grass starts to grow and birds are having their early morning concerts. This week has been my 2nd to last week in school and I've been standing almost everyday for almost 6 hours straight, you can imagine how I've felt in the evenings.

Yesterday and today I stared cutting my sewing projects from the fabrics I mentioned last week, I still have a few more to make.Somehow I ended up making kid's clothes. My mom told me that when I was a small kid my godmother had done my clothes from the same fabrics, so these fabrics have been in my closet for quite some time.

I started planning my next amigurumi project. I've never seen a Eurasian lynx in the wild, so I'm planning to make one for me. I'm not sure how to do it yet, but its going to fun to figure out during my summer break. I bought Drops Muskat and those new safety few months ago and I want to do something out of instead of my #uglyarns...

As you can see I'm not the best artist when it comes to drawing (that is why I blurred the pictue a bit), but I think I'll manage with this rough draft. Hopefully I have something finished to show you next time. When I get a new amigurumi-idea I need quite quickly to write it down and normally a make sketch as a reminder about what I've been thinking. Sometimes I even draw the pieces separately just to get the hang of the shape of different pieces. I always think that the head is the hardest piece to make (well not always, when I was knitting my yellow monkey's feet, that was a hard thing to figure out).

And by the way: Blessed Mother's day for every mom!

- Minttusuklaa

Sunday, May 7, 2017

Few weeks until summer

Hello all,

I got my last examens done past week and now I have a couple of weeks some extra courses to study. This weekend I went through my fabric stash that is even bigger than my yarn stash, believe me. My boyfriend kindly said to me that after the wedding he doesn't want that all my fabrics fill the closets. He thinks that I have a problem with giving away my fabrcis, which is probably true :) So I did some oraginizing and found out that I also have a need for uglyfabricstashbusting -project so that what I've been planning this weekend and my list includes: few overalls and kid's dresses/shirts/leggings should be enough.
I also have nice fabrics from old dress projects that are going to be turned into decorations for the wedding. My youngest sister and I made few prototypes of the flowers we're gonna use. My poor fox from my last posting had to stay as a model with roses.
I spent last week going though dozens of different fabric flowerpatterns and how-tos (I didn't study as well as I ought to have). This pattern was from a sewing handbook I bough last year. It is basically a wide fabric piece folded in half and sewn together. Super easy and quick to make.
I haven't forgottenmy #uglyarn projects neither. I began knitting this sweater about two weeks ago, but I've just had too much to do. Well I'm having my summer holiday in couple weeks and then I'm gonna finish this one. This sweater is made from fingering yarn that I really hate. The yarn is sooo slow to knit. The color is not so bad and many people like the yarn, but I made first ever baby sweater from this yarn when I was probably 13 and I hated knitting it.
I still have the sweater hidden in my closet, no one has ever used it, probably because it is so small.


 Today I had a long phone call with my friend and I can do multitasking so I started crocheting a friend for my fox.
He is supposingly a horse 🐎, but I guess he looks a bit like a porcupine, the nose is a bit off, next time I need to make a bit longer.
Next I'm probably going to crochet a rabbit 🐇 or a bear, or maybe a squirrel would be cute, I've once tried but it turned out quite odd.

Happy may for everyone 😄


Sunday, April 23, 2017

Planning

Hi,
This week I've had a practice week and every day has been so eventful and I've learnt quite much. And then I'm planning a wedding so I try not to tuen this blog into ä wedding blog. I actually like having many doable diy ideas and trust me when I say that the world of wedding blogs and forums and diy sites is scary and totally addicting at the same time. It is like a HUGE forest o:t desert where you can get totally lost.

And I've had time for #uglyarn. I made cardigan and a pair of gloves. The cardigan pattern is called Oakley.  Found it from Ravelry. I love the little pockets. Gloves are from garnstudios website, but the snowflake design was from Ravelry also.


Then for the wedding stuff: I want some random cute amigurumis for deflaation and this fox is the first protoype. I used Drops Muskat that is a DK yarn. He is probably a bit too big. Next one is going to be done from 4ply and 2mm book. Then I'll probably get the size right. The design is my own and ideas came from Finnish nature. I'll probably make more Finnish animals in near future.


Friday, April 14, 2017

Mr. Sea Turtle *free pattern

Hello and very blessed Easter-time for everyone 😄

I have a short break for Easter and it feels nice. I've had a hectic week with very much to do besides studying: visiting friends and relatives and so on and I had also time to write down my turtle pattern. The pattern isn't tested so please tell me if you find any errors.

 
I used:
Worsted yarn (green 1skein, yellow 1 skein and brwon skein) and 3mm hook, but 3.5mm hook is totally fine
DK yarn for cap and aran red for bucket
Safety eyes
Filling
Needle
Pattern is Us terms


Legs
With yellow yarn: ch4, turn, sc to 2nd ch from the hook, sc to end, turn sc to each ch on the other side. (6sc in total)
1) 2sc in each sc
2) [2sc, 1sc] repeat to end
3) [2sc, 1sc x2]repeat to end
4) [2sc, 1sc x3]repeat to end.
5) In BLO and change to green yarn: sc around
6-9) Sc around
10) [sc-dec, 1sc x 2] x 5, sc to end.
11) [sc-dec, 1sc] x5, sc to end.
12) [sc-dec] x 5, sc to end
13->) Sc around fifteen rows.
Make the other leg the same way

Body
 With yellow yarn: Ch2, 6sc to 2nd ch from the hook.
1) 2sc in each sc
2) [2sc, 1sc] repeat to end
3) [2sc, 1sc x2] repeat to end
4) [2sc, 1sc x3] repeat to end.
5) [2sc, 1sc x4] repeat to end
6) [2sc, 1sc x5] repeat to end
7) [2sc, 1sc x6] repeat to end.
8) [2sc, 1sc x7] repeat to end.
9-14) sc around
15) [sc-dec, 1sc x 7] repeat around
16-20) Sc around
21) [sc-dec, 1sc x6] repeat around.
22-24) sc around
25] [sc-dec, 1sc x5] repeat around.
26) sc around
27) [sc-dec, 1sc x4] repeat around
28) [sc-dec, 1sc x3] repeat around
29) [sc-around, 1sc x 2] repeat around
Bind off
 
Arms
With yellow yarn: Ch2, 6sc to 2nd ch from the hook.
1) 2sc in each sc
2) [2sc, 1sc] repeat to end
3) [2sc, 1sc x2] repeat to end
4) In BLO and change to green yarn, sc around
5-8) Sc around
9) [sc-dec, 1sc x6] repeat around
10-12) Sc around
13) [sc-dec, 1sc x 5] repeat around
14-16) Sc around
17) [sc-dec, 1sc x4] repeat around
18-19) Sc around
20) [sc-dec, 1sc x3] repeat around
21) Sc around

Head
With green yarn: Ch2, 6sc to 2nd ch from the hook.
1) 2sc in each sc
2) [2sc, 1sc] repeat to end
3) [2sc, 1sc x2] repeat to end
4) [2sc, 1sc x3] repeat to end.
5) [2sc, 1sc x4] repeat to end
6) [2sc, 1sc x2] repeat 6 times, sc to end
7) [2sc, 1sc x3] repeat 6 times, sc to end
8) 1sc x5, [2sc, 1sc x4] repeat [_] 4 times, sc to end
9-16) sc around
17) 1sc x5, [sc-dec, 1sc x4] repeat [_] 4 times, sc to end
18) [sc-dec, 1sc x2] repeat 6 times, sc to end
19) [sc-dec, 1sc x3] repeat 6 times, sc to end
20) [sc-dec, 1sc x4] repeat around
21) [sc-dec, 1sc x3] repeat around
22) [sc-dec, 1sc x2] repeat around
Bind off. Insert safety eyes before stuffing.

Shell
With brown yarn: Ch2, 6sc to 2nd ch from the hook.
1) 2sc in each sc
2) [2sc, 1sc] repeat to end
3) [2sc, 1sc x2] repeat to end
4) [2sc, 1sc x3] repeat to end.
5) [2sc, 1sc x4] repeat to end
6) [2sc, 1sc x5] repeat to end
7) [2sc, 1sc x6] repeat to end.
8) [2sc, 1sc x7] repeat to end
9) [2sc, 1sc x8] repeat to end
10) [2sc, 1sc x9] repeat to end
11) [2sc, 1sc x10] repeat to end
12-14) Sc around
15) In BLO: [sc-dec, 1sc x10] to end
16) [sc-dec, 1sc x9] repeat around
17) [sc-dec, 1sc x8] repeat around
18) [sc-dec, 1sc x7] repeat around
19) [sc-dec, 1sc x6] repeat around
20) [sc-dec, 1sc x5] repeat around
21) [sc-dec, 1sc x4] repeat around
22) [sc-dec, 1sc x3] repeat around
23) [sc-dec, 1sc x2] repeat around
Join yarn to the BLO round and Sc around picking up the front loop 2 rows.
 

Cap
With blue yarn: Ch2, 6sc to 2nd ch from the hook.
1) 2sc in each sc
2) [2sc, 1sc] repeat to end
3) [2sc, 1sc x2] repeat to end
4) [2sc, 1sc x3] repeat to end.
5) [2sc, 1sc x4] repeat to end
6) [2sc, 1sc x5] repeat to end
7) [2sc, 1sc x6] repeat to end.
8-10) Sc around

White part
1) Ch 7, turn, 1sc x6, turn, 1sc x6
2) 2sc, 1sc x 4, 2sc x2, 1sc x4, 2sc
3) 2sc, 1sc x 8, 2sc x2, 1sc x8, 2sc
4)  2sc, 1sc x12 , 2sc x2, 1sc x12, 2sc
5-6) Sc around, but between increases make sc-dec.

Button
Ch2, sc 5 to 2nd ch from the hook, sc around one round


Basket
With red yarn: Ch2, 6sc to 2nd ch from the hook.
1) 2sc in each sc
2) [2sc, 1sc] repeat to end
3) [2sc, 1sc x2] repeat to end
4) IN BLO: sc around
5) Sc around
6) [2sc, 1sc x3] to end
7) sc around
8) sc around
9) sc around
10) sc around


Finishing:
I do my finishing for toys in following way: I stuff the firmly, but not too much. And then place body parts together with pin needles and then sew. First I attached head to body and then arms and legs. And lastly shell. Then I sewed the cap parts together. If you want you can sew the cap to the head. 

Hope these notes are clear enough

Copyright: Minttusuklaa 
- you can sell toys made from this pattern, but please don't sell the pattern or claim it as your own